Marble Rye Bread Recipe: Swirls of Flavor in Every Slice! 🍞🌟🖤
1. Introduction
The marble rye bread recipe is a delightful twist on traditional rye bread, offering a visually stunning loaf with beautiful swirls of light and dark dough. This bread masterfully combines the tangy and slightly sour flavor of rye with subtle hints of cocoa and molasses, creating a complex flavor profile that’s both comforting and intriguing. Whether you’re looking to elevate your sandwiches, create the perfect toast, or simply enjoy a slice with butter, this swirled rye bread recipe is guaranteed to impress. Baking bread at home can be incredibly satisfying, and this marble rye is no exception. In this article, we’ll guide you through each step of the process, from preparing the dough to achieving that perfect bake, ensuring you can easily bake your own perfect marble rye bread right in your kitchen. Forget store-bought loaves – get ready to create a bakery-worthy loaf with this easy-to-follow guide! And after enjoying your bread, why not check out some equally satisfying recipes, such as a comforting soup?
2. What is Marble Rye Bread?
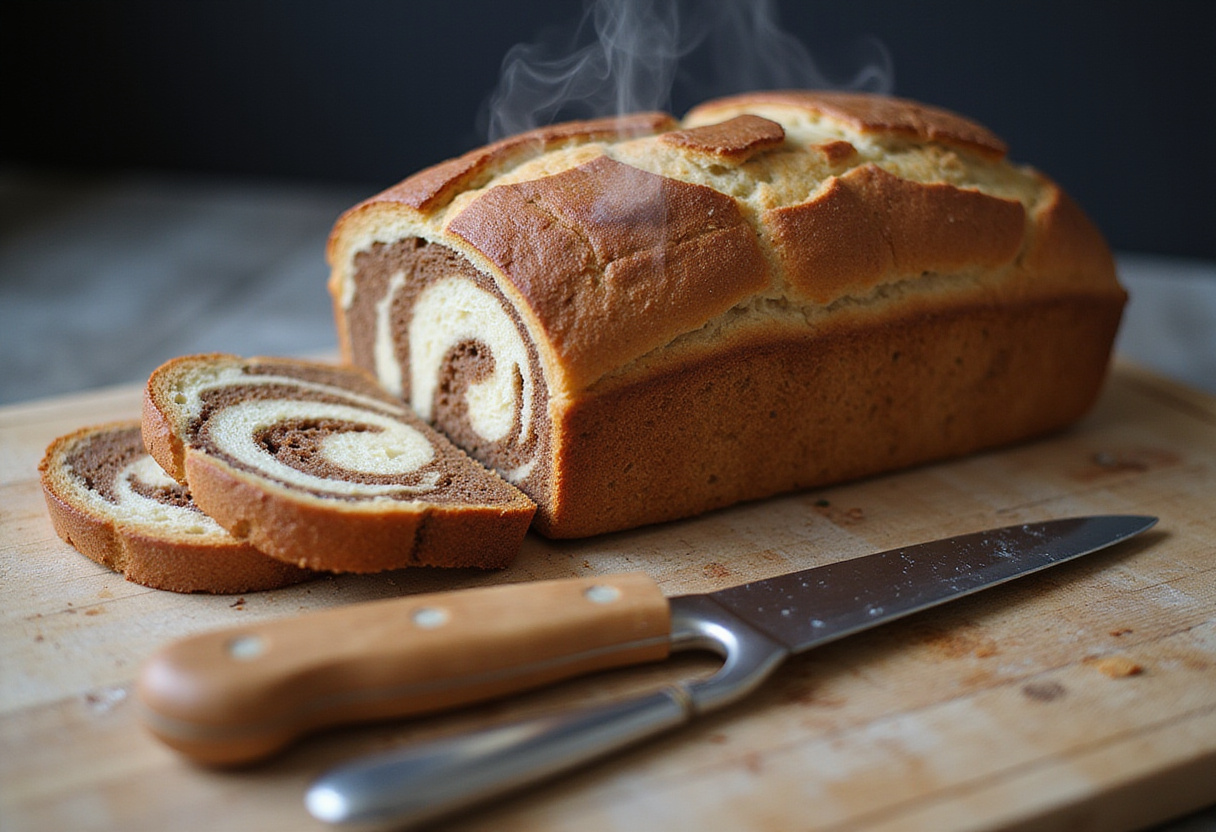
Marble rye bread is a unique and visually appealing type of bread that stands out due to its distinctive swirled pattern, which is artfully achieved by combining contrasting light and dark doughs. The dark dough in a rye marble bread instructions typically derives its rich color and depth of flavor from ingredients like cocoa powder, molasses, or even a touch of coffee. This ingenious combination creates a visually appealing contrast with the lighter rye dough, resulting in a bread that’s as beautiful as it is delicious. The marbled rye bread tutorial involves a meticulous process of carefully layering and twisting the two doughs together before baking, creating those signature swirls that make marble rye so recognizable. Making marble rye is a great baking project, and it’s perfect alongside a warm soup on a cold day!
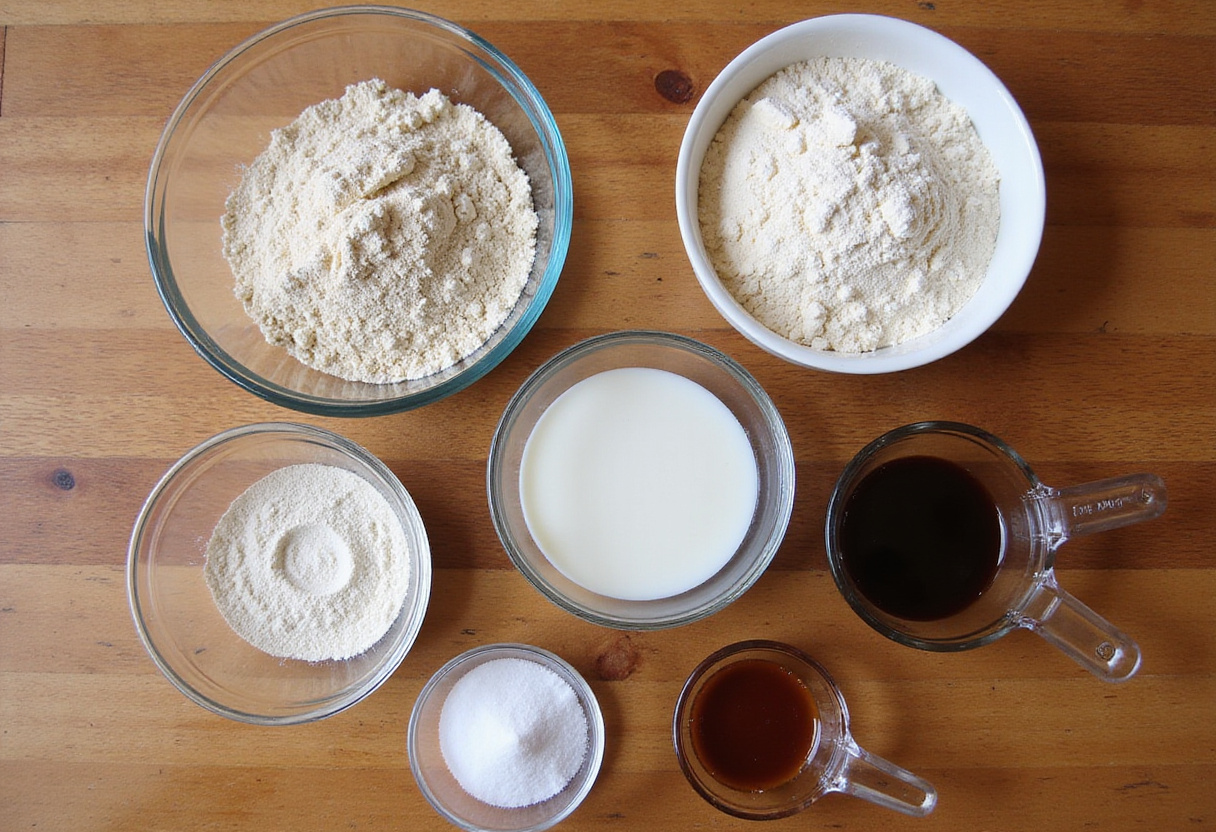
3. Key Ingredients for Marble Rye Bread
Achieving the perfect marble rye requires careful selection of ingredients. Here’s a breakdown of the essential components:
- Rye Flour: Absolutely essential! This forms the base of our bread, providing that distinctive tangy and slightly sour flavor that is characteristic of rye.
- Bread Flour: Adds essential structure to the dough. Bread flour has a higher protein content than all-purpose flour, which helps create a chewier, more satisfying texture.
- Cocoa Powder: This is the secret ingredient for the dark dough! It gives the dark dough its rich, deep color and contributes a subtle, chocolatey flavor that complements the rye beautifully.
- Molasses: Enhances the dark dough with a deep, sweet, and slightly smoky taste. It also contributes to the dough’s moisture and helps create a beautiful, dark color.
- Yeast: Absolutely essential for leavening the bread. Yeast ensures a light and airy texture, preventing the bread from becoming dense or heavy. Make sure your yeast is fresh for the best results! For tried and tested yeast, you can find reliable options at Red Star Yeast’s website.
- Caraway Seeds: Completely optional, but highly recommended for those who appreciate a truly traditional rye bread flavor. They add a distinctive aroma and a slightly peppery taste.
4. Step-by-Step Marble Rye Bread Recipe
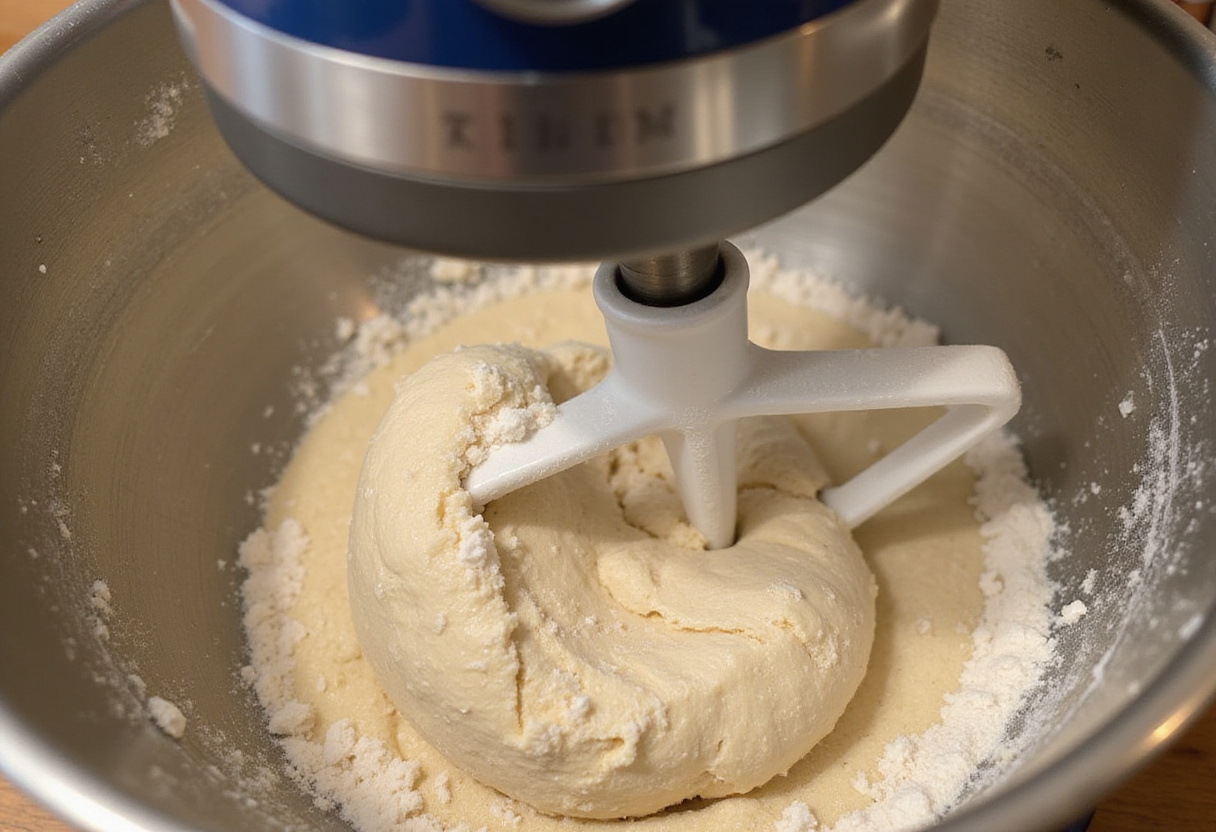
Step 1: Prepare the Dough
Let’s get started! In a large bowl (or the bowl of your stand mixer), whisk together the rye flour, bread flour, yeast, sugar, and salt. Add warm water and oil. Mix until a shaggy dough forms. Divide the dough in half as evenly as possible. In one half, knead in cocoa powder and molasses until the color is uniform and well combined. You might need to add a teaspoon or two of water to this dough to get it to the right consistency. This part of the marble rye bread recipe ensures each dough has its unique flavor profile and color.
Step 2: Knead and Proof
Now comes the kneading! Knead both doughs separately for about 5-7 minutes each, until they are smooth and elastic. A stand mixer with a dough hook makes this much easier, but you can definitely do it by hand. Place each dough in a lightly greased bowl, turning to coat. Cover the bowls with plastic wrap or a clean kitchen towel and let rise in a warm place for 1-1.5 hours, or until doubled in size. This step is absolutely crucial for achieving a light and airy swirled rye bread recipe. Don’t rush it!
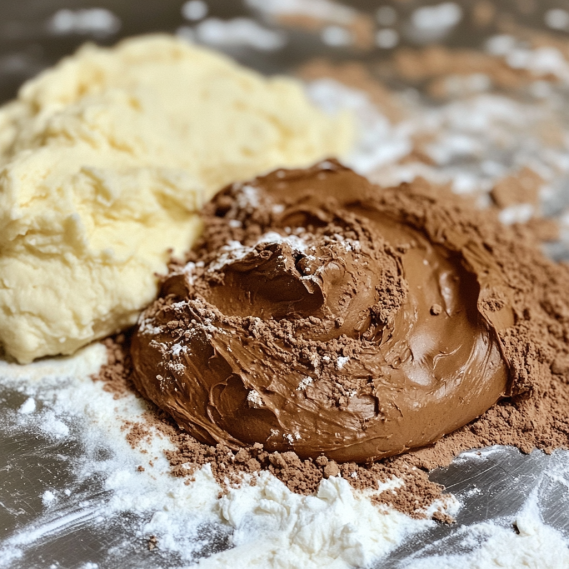
Step 3: Create the Marble Effect
Gently punch down both doughs to release the air. On a lightly floured surface, roll each dough into a rectangle, aiming for roughly the same size. Place the dark dough rectangle carefully on top of the light dough rectangle. Now for the fun part! Roll the two layers up together tightly, starting from one of the short ends. Once rolled, twist the dough a few times gently to further encourage the marble effect. Be careful not to over-twist, or you’ll lose the distinct swirls. This is where the marbled rye bread tutorial really comes to life, and you’ll start to see that beautiful pattern emerge.
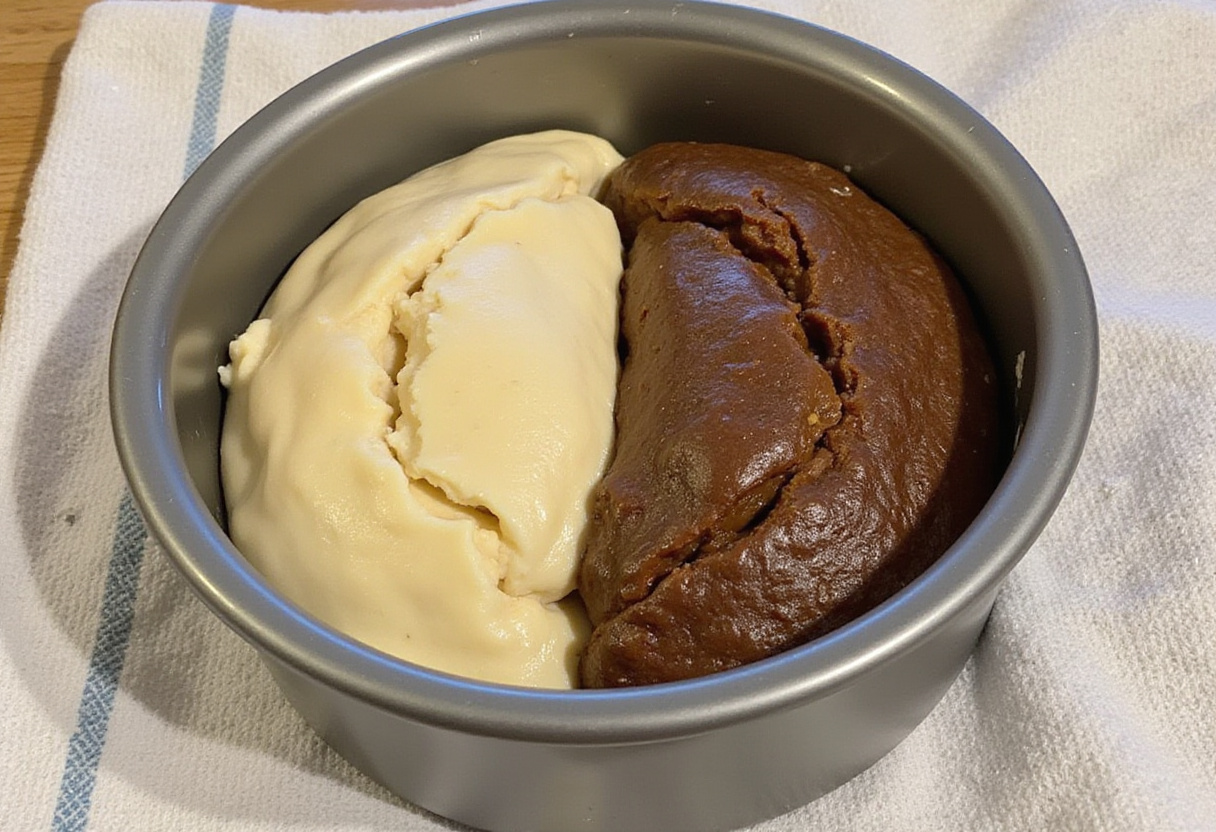
Step 4: Bake to Perfection
Carefully place the swirled dough seam-side down in a greased 9×5 inch loaf pan. Cover the pan loosely with plastic wrap or a clean kitchen towel and let rise for another 30-45 minutes, or until the dough has risen noticeably but not quite doubled. While the dough is proofing, preheat your oven to 375°F (190°C). Once the dough has proofed, bake for 35-40 minutes, or until the internal temperature reaches 200°F (93°C). You can use a digital thermometer to check. The loaf should be nicely browned. Let the bread cool completely in the pan before slicing and serving. This is important to prevent a gummy texture. Enjoy your homemade rye marble bread instructions! Serve it with some salad for a complete lunch!
5. Tips for the Perfect Marble Rye Bread
Here are some essential tips to ensure your marble rye turns out perfectly every time:
- Use a Stand Mixer: While not strictly required, a stand mixer simplifies the kneading process immensely, and proper kneading is vital for dough development and gluten formation.
- Ensure Even Proofing: Consistent temperature is key for proper rising. Find a warm, draft-free spot in your kitchen for proofing. You can even proof in your oven with the light on.
- Don’t Overbake: Overbaking can lead to dry, crumbly bread. Use a reliable thermometer to check for doneness. The internal temperature should reach 200°F (93°C).
- Cool Completely: This is crucial! Slicing the bread while it’s still warm can result in a gummy, unpleasant texture. Patience is key!
6. Variations and Additions
Want to customize your marble rye? Here are some delicious variations and additions to try:
- Caraway Seeds: For a classic rye flavor, add 1-2 tablespoons of caraway seeds to the dough during the kneading process.
- Onion or Garlic Powder: Mix in a teaspoon of onion or garlic powder into either the light or dark dough for a savory twist.
- Cheese: Incorporate shredded cheese, such as Swiss or Gruyere, into the dough for added flavor and texture. About 1/2 cup to 1 cup should be sufficient. And if you love cheese, you have to try this grilled cheese sandwich!
7. Serving Suggestions
Marble rye bread is incredibly versatile and can be enjoyed in countless ways. It’s a perfect base for sandwiches, especially classics like a Reuben or a turkey and Swiss with your favorite toppings. It’s also delicious toasted with butter, cream cheese, or avocado. Serve it alongside hearty soups and fresh salads for a complete and satisfying meal. The unique flavor of the marble rye bread recipe pairs exceptionally well with smoked meats, cheeses, and pickled vegetables. Or you can even make it at breakfast and serve it with eggs and other dishes.
8. Storing Your Marble Rye Bread
Proper storage is essential to keep your homemade marble rye bread fresh and delicious:
To keep your marble rye bread fresh, store it in an airtight container or a resealable plastic bag at room temperature for up to 3 days. For longer storage, you can freeze it. Slice the bread before freezing for easier serving later. Wrap the loaf tightly in plastic wrap, then place it in a freezer bag. When ready to use, thaw at room temperature or lightly toast from frozen.
9. Conclusion
Baking a marble rye bread recipe at home is a truly rewarding experience. While the process may seem a bit involved at first, with our detailed guide, helpful tips, and a little practice, you’ll be able to consistently create a beautiful and delicious loaf that will impress your family and friends. Embrace the delightful swirls, savor the rich flavor, and enjoy the satisfaction of your homemade marble rye bread. Happy baking! And if you enjoyed this baking experience, explore other delicious recipes in our baking category!
Print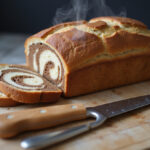
marble rye bread recipe
- Total Time: 2 hours 45 minutes
- Yield: 1 loaf
- Diet: Vegetarian
Description
Bake a stunning Marble Rye Bread at home with this easy recipe! Swirls of tangy rye and cocoa create a bakery-worthy loaf perfect for sandwiches, toast, or enjoying with soup. Follow our step-by-step guide for a delicious and impressive bread.
Ingredients
- Rye Flour: The base of our bread, providing a distinctive tangy flavor.
- Bread Flour: Adds structure and helps create a chewy texture.
- Cocoa Powder: Gives the dark dough its rich color and subtle chocolate flavor.
- Molasses: Enhances the dark dough with a deep, sweet taste.
- Yeast: Essential for leavening the bread, ensuring a light and airy texture.
- Caraway Seeds: Optional, but adds a traditional rye bread flavor.
- Warm Water: Activates the yeast and binds the dough.
- Vegetable Oil: Adds moisture and improves the texture of the bread.
- Sugar: Feeds the yeast and adds a hint of sweetness.
- Salt: Enhances the flavor and controls the yeast activity.
Instructions
- Prepare the Dough: In a large bowl, mix rye flour, bread flour, yeast, sugar, and salt. Add warm water and oil. Mix until a shaggy dough forms. Divide the dough in half. In one half, knead in cocoa powder and molasses until well combined.
- Knead and Proof: Knead both doughs separately for about 5-7 minutes until smooth and elastic. Place each dough in a greased bowl, cover, and let rise for 1-1.5 hours, or until doubled in size.
- Create the Marble Effect: Punch down both doughs gently. Roll each dough into a rectangle. Place the dark dough rectangle on top of the light dough rectangle. Roll them up together tightly. Twist the dough a few times to create the marble effect.
- Bake to Perfection: Place the swirled dough in a greased loaf pan. Cover and let rise for another 30-45 minutes. Preheat your oven to 375°F (190°C). Bake for 35-40 minutes, or until the internal temperature reaches 200°F (93°C). Let cool completely before slicing and serving.
Notes
- For a richer chocolate flavor, use dark cocoa powder.
- If you don’t have molasses, brown sugar can be used as a substitute.
- Ensure your yeast is fresh for the best rise.
- Don’t over-knead the dough, as this can result in a tough bread.
- A stand mixer makes the kneading process easier, but you can also knead by hand.
- Prep Time: 25 minutes
- Cook Time: 40 minutes
- Category: Bread
- Method: Baking
- Cuisine: American
Nutrition
- Serving Size: 1 slice
- Calories: 180 Kcal
- Sugar: 5g
- Sodium: 220mg
- Fat: 3g
- Saturated Fat: 0.5g
- Unsaturated Fat: 2g
- Trans Fat: 0g
- Carbohydrates: 34g
- Fiber: 3g
- Protein: 6g
- Cholesterol: 0mg
Keywords: marble rye bread, rye bread recipe, swirled rye bread, homemade bread, baking, bread recipe, rye marble bread, marbled rye bread tutorial